Tuesday, July 31, 2012

School Dazzle: $6 Makeup Look!!

I hate spending a lot of money on makeup. Almost all of makeup was under $10 for an item. One place I love to get makeup from is the dollar store. You're probably thinking I am crazy however, my best makeup comes from there. It is usually better than items I spend $7 on. I will admit I do not like most dollar store lipgloss or mascara. My favorite makeup brand is LA colors. There makeup is wonderful and is the makeup I fist ever used. Today's post is a whole makeup look for $6. I thought it was great for girls on a budget and that need makeup for school.

The products I use are
LA Colors: (Sold at dollar Tree, Dollar General, and Family Dollar)
Shimmering Loose Eyeshadow in Snow White $1
Foundation (as eye primer) $1
Pressed Powder in Nude $1
Lipstick/gloss (only gloss I actually like) in Twinkle. $1
ELF: (sold at Target or eyeslipsface.com)
Shimmering Eyeliner Pencil in black $1
Lengthening and Defining Mascara in black. $1
** I actually suggest Wet N Wilds color icon eyeliner in black. (sold at Dollar General, CVS, Walgreens for $1) I couldn't find it so I used the ELF one.

For eyeshadow they have really pretty browns if you do not like the white. I really love the white one for a quick look or when I want my eyeshadows shimmery. All you do is apply it right over the color. I LOVE shimmery eyeshadows. I just think they are so pretty and add glam to my eyes.

Please leave any request you have below. !
Love K

Sunday, July 29, 2012

This or That? Beauty Blog Tag

This Or That? Beauty Blog Tag


MAKEUP:

blush or bronzer:
Blush

lip gloss or lipstick:
Lipgloss

chapstick or lip butter:
Chapstick

matte eye shadow or sparkle:
Sparkle!! If you know of any drugstore ones please tell me on a search for more.

eye liner or mascara:
Hard One!! Mascara.

gel, liquid or cream eye liner:
Liquid but usually a pencil.

Foundation or concealer:
Foundation.

liquid or powder foundation:
Liquid but preferably cream or whipped.

Neutral or color eye shadow:
Neutral

pressed or loose eye shadows:
Pressed

Waterproof or none waterproof:
Waterproof

brushes or sponges:
Bushes for everything but foundation. I still have found a good foundation brush.

Powder highlighter, cream or liquid:
Powder. That's all I own.

NAILS:

OPI or Essie:
Have not tried either. ):

Acrylic or natural:
Natural

Brights or darks:
Brights.

Matte or shiny:
SHiny

Glitter or no glitter:
Glitter

BODY:

Perfume or body splash:
Perfume

lotion or body butter:
Lotion

Body wash or soap:
Body wash. Doves(:

Self tanners or natural:
Natural.


I tag all of you who read this.

Let me know in the comments section below if you do so I can check out your answers


Saturday, July 28, 2012

Blabber:Food, Nail Polish, and Words! Oh My

These are my discoveries for the week. They are off pinterest. I found them cute.

Friday, July 27, 2012

School Dazzle: Eye Look (Drugstore)

Lastnight I had 3 friends over. We did nails, makeup, and chatted. It was great. Today they all went home. ): Anyways, I was bored so I did my makep with my moms. Lol. I really was covergirls shimmering sands and seen my mom had it so, I decided to use it. These are the eyeshadows I am going to go buy for school. I love the shimmer in them and you can check out my Get The Look: Selena Gomez where she wears them.

I took elfs $1 eyeshadow brush and put the lightest shade over my entire lid. I then took the darkest shade and put it in my crease. To add a little more color I took the medium shade and applied to my crease but, blended it downward to add color to my lid. I then took Maybelline Smoked Kohl eyeliner in brown and lined my lower and upper lash lines. Finally I applied one coat of Covergirls Volume Mascara. I think this makes a great everyday look and is cheap and pretty for back to school.
If I was to do my whole face I would do foundation, powder , this eye look, then a peachy cheek color with a natural lipstick or gloss.

I hope you are ready for back to school It is coming around so fast for me. I will do a haul when I am completely done shopping. Enjoy your Friday.

Love Kurstin.

Monday, July 23, 2012

Manicure Monday: Silver Nails

 I never paint my nails silver so I decided too. I actually really like them. I am using NYX Tribeca Silver. After that I got thinking doing one pop color would be pretty so I painted one of nails pink. I used sinful colors for the pink. I think it turned out really cute. Let me know if you try it. Leave your request below.


Saturday, July 21, 2012

Review Thursday: Drugstore Concealers

I was asked to do a blog post on cheap Concealers so I took it as ones from a drugstore. I am just going to show the drugstore Concealers I use or have good reviews on them.

1. Almays smart shade concealer. I use this concealer and it is good. It does cover up red spots and pimples but not completely. I suggest this for just a light concealer for girls who barely use concealer like me. $3
2. Hard Candy's Glamoflauge concealer is a concealer for full coverage. You can buy hard candy at Walmart. This concealer is $6. I suggest this one for a full coverage concealer.
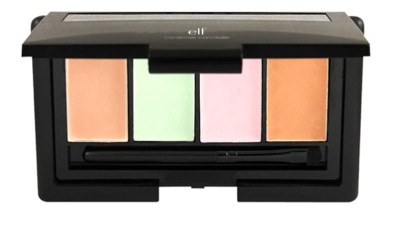
3. ELFs concealer pallette is sold at target or you can buy it online at eyeslipsface.com. This one is amazing you have all you need in one cheap little palette. I would get this one if you have a target or can buy offline. It is $3
4. Revlons photo ready concealer is a great concealer and easy to carry with you. It is $4-$6 and is sold at any drugstore.

These are the Concealers I would use. I hope you enjoyed and please leave your request below.

Kurstin

Thursday, July 19, 2012

DIY: Painted Tip Makeup Brushes

I found this a long time ago and did it to all my brushes. Well since then I have collected a few more so today I decided to paint the tips of them. I like doing this because it tells my brushes apart from other peoples and it is cute.

You will need:
•tape •nail polish •a makeup brush • a folded piece of paper to lay your parishes on or a folded wash cloth.

Take your makeup brush and put a piece of tape about half an inch down the brush. TIP: if you fold one of the ends of tape where it wont stick it will make removing it easier.

Now start painting your brush I go in an upward motion and do the very top part last.

Put your brush on the paper so the end is not touching anything. Let dry. Now look and see if your brush needs a second coat. My black brushes need 2 coats as my white didn't. If they don't need another coat peel the tape off. Remember that some of the paint may come up! The lines also will not be perfect. If they need another coat paint and let dry then peel the tape off. TaDa now you're finished and have amazing beautiful brushes. Hope you enjoyed my DIY post.
Love Kurstin